Mission Briefing
By the end of this mission, you will be able to:
Explain what an LED is and why polarity (direction) matters
Explain why a resistor is needed with an LED
Describe how a microcontroller turns an LED ON and OFF using HIGH and LOW
Build and code a circuit that blinks an LED every second
Let's Get Started
Have you ever wondered how the tiny lights in toys, robots, and gadgets turn ON and OFF? In this lesson, you'll meet the LED (Light Emitting Diode), one of the most popular electronic components. You'll learn how to safely connect an LED, why it needs a resistor, and how to use your ESP32 to make it blink.
Robo says: “Every great electronics project starts with a single blinking LED — it's basically a rite of passage! Let's wire one up and bring it to life.”
Polarity (Direction Matters!)
LEDs have two legs, and they are not interchangeable:
Anode (+): the longer leg, connects to positive voltage
Cathode (–): the shorter leg, connects to ground
If connected the wrong way, the LED will not light up.
Current (Why We Need A Resistor)
LEDs require a limited amount of current to operate safely. Too much current can damage or burn out the LED.
A resistor is used in series with the LED to control current flow.
Typical value: 220Ω – 330Ω for Arduino/ESP32 projects.
Digital Output (Controlling With ESP32/ARDUINO)
A microcontroller (like an ESP32) controls an LED using a digital pin:
HIGH (1): sends voltage, LED turns ON
LOW (0): no voltage, LED turns OFF
This simple ON/OFF control is the foundation for more advanced projects like blinking patterns, dimming (PWM), and interactive electronics.
Equipment
- ESP32 board
- 1 LED
- 220Ω resistor
- Breadboard + jumper wires
Activity
Make an LED blink every second.
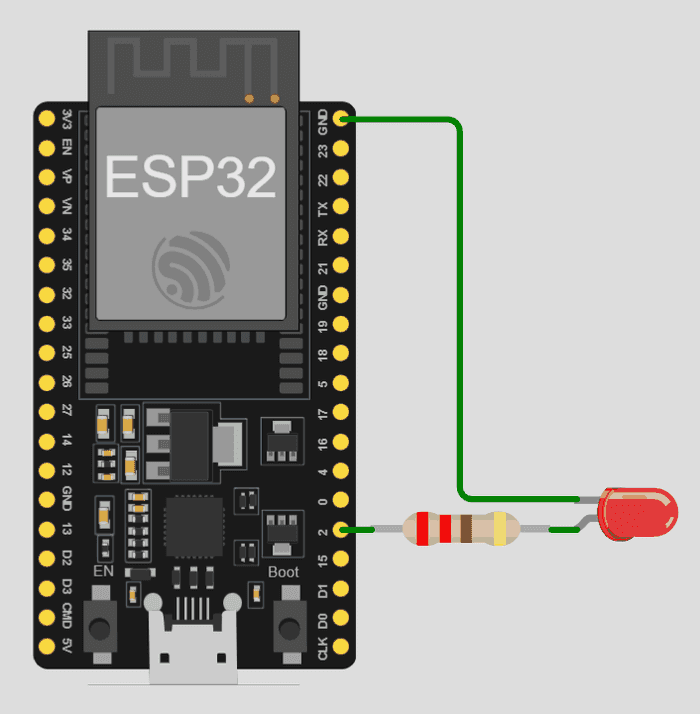
Wire your LED to the board: anode through the 220Ω resistor to a digital pin, cathode to ground.
Double-check the longer leg (anode) goes to the resistor side — see the wiring diagram at the end of this lesson if you're not sure.
Code
int ledPin = 2;
void setup() {
pinMode(ledPin, OUTPUT);
}
void loop() {
digitalWrite(ledPin, HIGH);
delay(1000);
digitalWrite(ledPin, LOW);
delay(1000);
}
Did You Know?
- • LED stands for Light Emitting Diode — a diode that gives off light when current flows through it in the correct direction.
- • LEDs use far less energy and last far longer than old-fashioned incandescent bulbs, which is why they're used almost everywhere today.
- • The first practical LED was created in 1962 by engineer Nick Holonyak Jr.
🔧 Try It Yourself
Try these challenges with your code, then write down what you changed:
Example: Changed both delay(1000) values to delay(500) to double the blink speed.
• Change the blink speed from 1 second to 0.5 seconds.
• Make the LED stay ON for 2 seconds and OFF for 1 second.
• Count how many times the LED blinks in 10 seconds.
int ledPin = 2;
void setup() {
pinMode(ledPin, OUTPUT);
}
void loop() {
digitalWrite(ledPin, HIGH);
delay(1000);
digitalWrite(ledPin, LOW);
delay(1000);
}Upload this code and confirm the LED blinks once per second.
Modify the code so the LED stays ON for 2 seconds and OFF for 1 second, then re-upload and observe the new pattern.
That's two different delay() values instead of matching ones — one controls the ON time, the other the OFF time.
Think About It
🤔 Discuss With a Partner or Write Your Answer
What do you think would happen if you swapped the LED's legs (reversed its polarity) in the circuit? Use what you learned about anode and cathode to explain your answer.
Quick Recap: Fill In The Blanks
1. The longer leg of an LED is called the ________ and connects to positive voltage.
2. The shorter leg of an LED is called the ________ and connects to ground.
3. A ________ is used in series with an LED to limit current and protect it from damage.
4. Sending ________ to a digital pin turns the LED ON.
Match It!
Draw a line (or write the matching letter in the blank) to connect each word to its meaning.
Check Your Understanding
I can explain what an LED is and why polarity (direction) matters
I can explain why a resistor is needed with an LED
I can describe how a microcontroller turns an LED ON and OFF using HIGH and LOW
I can build and code a circuit that blinks an LED every second
Quiz Time!
Question 1: What happens if you connect an LED backwards?
🔍 Reveal answer (drag-select the blank space): B
Question 2: Why do we use a resistor with an LED?
🔍 Reveal answer (drag-select the blank space): B
Question 3: Which ESP32 command turns a digital pin ON?
🔍 Reveal answer (drag-select the blank space): B
Challenge Zone
🏆 Level Up
Can you make the LED blink 10 times, then stop completely?
Make the LED blink exactly 10 times, then stop completely.
Robot Journal
In your own words, explain what would happen to your circuit if you forgot to include the resistor. Why does that matter?
Key Vocabulary
Term
Definition
LED
Light Emitting Diode — lights up when current flows through it correctly.
Anode
The longer leg of an LED; connects to positive voltage.
Cathode
The shorter leg of an LED; connects to ground.
Resistor
A component that limits current flow to protect the LED.
Digital Pin
A pin that can be set to HIGH (on) or LOW (off).
Lesson Wrap-up
🤖 Robo Says
You just built and coded your first electronic circuit — nice work! Next up: Lesson 2 — we'll give your LED some rhythm with custom blink patterns.
Wiring Diagram
Quick Check
Which leg of an LED is the anode (+)?
What do you think happens if you wire the LED in backwards — anode to ground, cathode to the resistor?
Complete the sentence: A ______ limits the current flowing to the LED so it doesn't burn out.
Fill in the missing value: this pattern keeps the LED on for the same length of time it's off.
void loop() {
  digitalWrite(LED_PIN, HIGH);
  delay(______); // same as the LOW delay below
  digitalWrite(LED_PIN, LOW);
  delay(1000);
}Match each term to what it means.
Put these steps in the order you'd follow to wire and blink an LED for the first time.
In your own words: why does an LED circuit need a resistor?